
Improving Automated UI Test Reliability without Rearchitecting Your Solution
Early in my automation career, a senior coworker once told me, "writing automated UI (User Interface) tests is the art of crafting good selectors." By "selector," I mean some methodology for finding UI elements on a webpage or application window. Standard methods are CSS Selectors and XPaths.
Several years later, I’ve seen firsthand why this is one crucial but often overlooked aspect of automated UI testing.
Getting Started
Two situations are impacted significantly by crafting good selectors:
First: Many testing tools relying on "record and playback" generally promise that a non-technical person can produce quick automation. Casting aside the broader pros/cons discussion, often, these tools do not produce robust selectors that minimize test fragility. These tests must continually be updated even if benign portions of the application change.
Second: Debugging failing tests becomes much easier if you have confidence in your selectors. If an engineer is trying to figure out why a test fails but doesn’t have reasonable assurance the selectors are finding the correct elements, they could spend hours chasing red herrings.
A good selector can minimize this pain in both scenarios, and those often require a manual touch. Tools like SelectorsHub or machine learning-based solutions do a better job, but I’ve yet to find one that doesn’t require at least a review of the selector created.
Walking Through the Selector Process
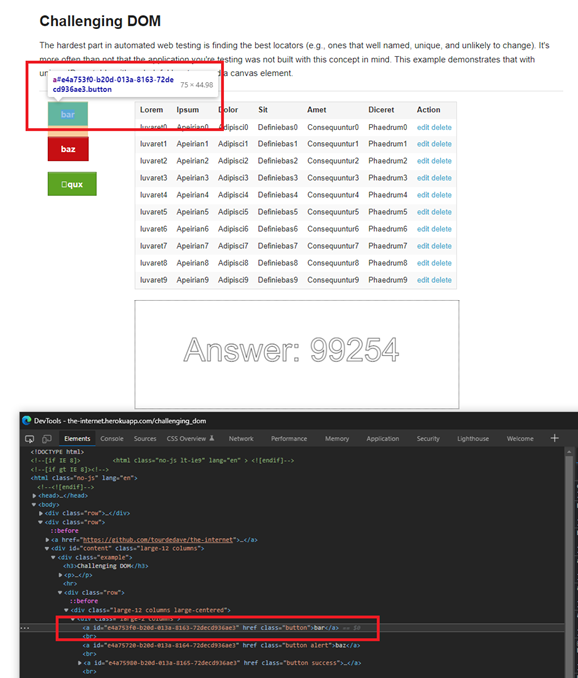
Let’s look at a page provided by SauceLabs called ‘The Internet,’ specifically the Challenging DOM example. If you refresh this page a few times, you see the blue, red, and green buttons change text almost every time. So does the "Answer" number at the bottom of the page. The grid is all generic <tr>’s and <td>’s.
Starting with the blue button on the left, let’s see what Chrome Dev Tools creates for us when focusing on the button element (which is a hyperlink):
- XPath:
//*[@id="5c760c00-ed7c-0139-7a9d-4e27162c1ad9"] - Full XPath:
/html/body/div[2]/div/div/div/div/div[1]/a[1]
The first looks very similar to a GUID. Sure enough, when refreshing while viewing the DOM, it is different every time. The XPath is keying off dynamic data and won’t allow for a good test.
The second has a different problem: it still finds the element every refresh, but the selector fails if any change occurs in that chain of elements.
NOTE: There are two different ways to approach this particular challenge, and it demonstrates why we, as quality champions need a level of knowledge of the functionality. A coworker recommended writing a selector for finding the element based on the text "foo." The assumption is that "foo" would always submit some data when clicked. I thought that the changing text could represent something like localization, so I assumed following the color was correct (handling localization could be a separate article.)
In this case, we want to follow the text. We can do that with something like that with XPath:
- XPath:
//a[text() = 'foo']
In my case, I decided to follow the class, which is what is driving the styling here. The blue button’s class is "button," while the other two are "button alert" and "button success":
- XPath:
//a[@class="button"] - CSS Selector:
a[class="button"]
In both cases, this always gets either button foo or the blue button, regardless of whether the ID changes or changes position in the DOM.
Now let’s look at the table. I’m going to pick the first edit button. When I use dev tools, I get:
- XPath:
//*[@id="content"]/div/div/div/div[2]/table/tbody/tr[1]/td[7]/a[1] - Full XPath:
/html/body/div[2]/div/div/div/div/div[2]/table/tbody/tr[1]/td[7]/a[1]
So no dynamically created properties, but somewhat gross. Again, if anything changes in this chain, the selector breaks. As above, there are some considerations:
- Do we always need the first edit link, or will it vary based on the test?
- Will we ever have a test add or delete a row and then try to find an edit button that is now in a new position?
- What if we want to edit more than one?
We have some different options available here using some different search patterns. To start, we could look at the unique parent element (which appears to be the table body,) narrow our search to the row we want, and then jump straight to fetching the first hyperlink:
- XPath:
//tbody/tr//a- Note: this implicitly gets the first child ‘tr,’ and its first ancestor ‘a’ under tbody; to be explicit, you can do:
//tbody/tr[1]//a[1]
- Note: this implicitly gets the first child ‘tr,’ and its first ancestor ‘a’ under tbody; to be explicit, you can do:
- CSS Selector:
tbody>tr a- Note: the space between
trandais important; it’s CSS’s ancestor search. As above, to remove the implicit ordering:tbody>tr:first-of-type a:first-of-type
- Note: the space between
If the grid changes during your test, you would need logic to change if you get the first, second, or nth tr. In that scenario, you could have something like this, where n is the exact row number (one-based):
- XPath:
//tbody/tr[n]//a[1] - CSS Selector:
tbody>tr:nth-of-type(n) a:first-of-type
Wrapping Up
Believe it or not, we just stepped through creating some of the more difficult selectors you’ll likely encounter in your career. Luckily, if you’re working on an internal application, developers (or you!) can often go in and add custom IDs. The creation of element selectors has gotten so prevalent that Microsoft’s new web UI automation tooling has a section devoted to them.
One final note — it’s always essential to test your selector before hooking it into a test. Sometimes, when I forget, I’ll encounter a selector finding multiple elements I didn’t expect or typoed something. Testing your test is also vital if you want to ensure you don’t have pain later!
What are some other examples where a well-crafted selector saved debugging and test triage time? Let me know in the comments below!
Want More?
Need more tips on testing your app? Check out Microsoft MVP Kevin Bost’s blog on practical unit testing and shifting left.

Does Your Organization Need a Custom Solution?
Let’s chat about how we can help you achieve excellence on your next project!
Comments are closed.